Learn how to add Amazon Affiliate Links to your WordPress site effortlessly. Maximize your revenue with our comprehensive tutorial!
Monetizing a blog or website through Amazon’s Affiliate Program can turn your passion into passive income.
By strategically placing affiliate links within your WordPress posts and pages, you guide readers from your content directly to products on Amazon—earning you a commission for every sale.
Whether you’re writing product reviews, tutorials, or listicles, embedding Amazon affiliate links correctly is crucial for click-through rates, compliance, and long-term success.
This guide walks you through every step, from getting your links to advanced automation with Affpilot AI.
What Are Amazon Affiliate Links?
Amazon Affiliate (or “Amazon Associates”) links are unique URLs that include your Associate ID. When a visitor clicks your link and buys anything on Amazon within 24 hours, you earn a commission on eligible purchases.
- Associate ID: Your unique identifier, e.g., yourassociate-20.
Link Structure:
https://www.amazon.com/dp/B08N5WRWNW?tag=yourassociate-20
- Cookie Window: Once clicked, Amazon tracks purchases for 24 hours (extended to 90 days if the customer adds a product to their cart).
Why Use Amazon Affiliate Links on WordPress?
- Passive Income: Earn while you sleep.
- Trust & Convenience: Readers already know Amazon and feel secure buying.
- Scalable: Thousands of products to promote.
Before You Start: Prerequisites
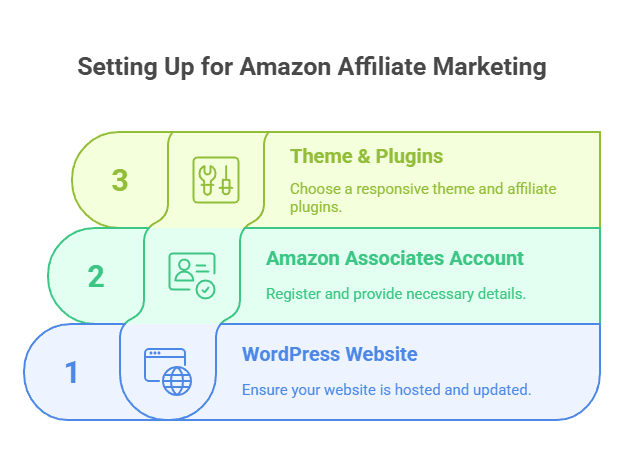
- WordPress Website
- Hosted (e.g., Bluehost, SiteGround).
- Latest WordPress version.
- Hosted (e.g., Bluehost, SiteGround).
- Amazon Associates Account
- Register at https://affiliate-program.amazon.com.
- Provide site details, tax info, and payment method.
- Register at https://affiliate-program.amazon.com.
- Theme & Plugins
- A clean, responsive theme.
- Optionally, an affiliate link management plugin (Pretty Links, ThirstyAffiliates).
- A clean, responsive theme.
Step 1: Getting Your Amazon Affiliate Links
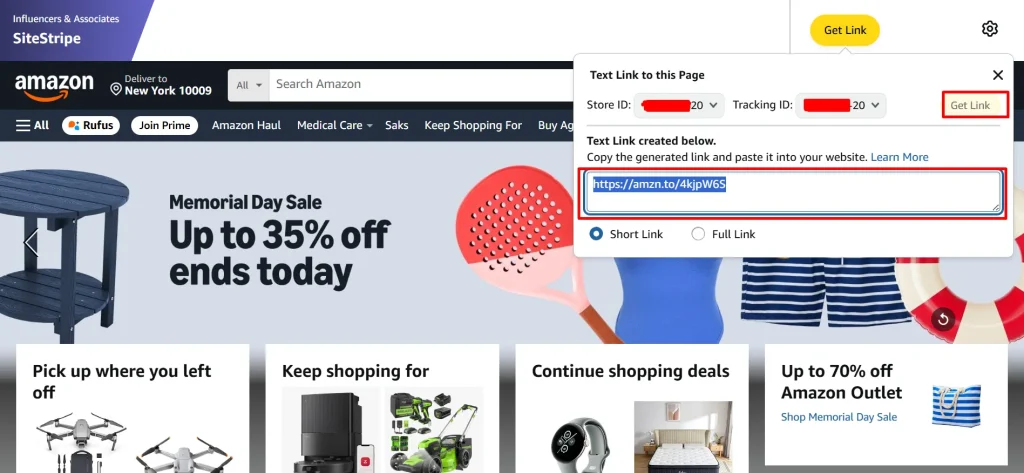
1.1 Enable Amazon SiteStripe

After logging into Amazon Associates, SiteStripe appears at the top of Amazon.com. It lets you grab links instantly.
- Text Link:
- Search for any product on Amazon.com.
- Click Text in the SiteStripe bar.
- Copy the URL or the HTML snippet.
- Search for any product on Amazon.com.
- Image Link:
- Click Image.
- Choose size (small, medium, large).
- Copy the HTML code.
- Click Image.
- Text + Image:
- Click Text+Image.
- Copy the combined HTML.
- Click Text+Image.
1.2 Use the Associates Dashboard
For more control:
- In Associates Central, go to Product Linking > Product Links.
- Search by keyword, ASIN, or ISBN.
- Click Get Link next to your chosen product.
- Customize your link type and copy the code.
Step 2: Manually Adding Affiliate Links in WordPress
2.1 Classic Editor
- Switch to “Text” View
- In the WordPress editor, click Text.
- In the WordPress editor, click Text.
- Paste HTML Snippet
- For SiteStripe HTML, paste directly.
- Preview to confirm layout.
- For SiteStripe HTML, paste directly.
- Add Link to Text
- Switch to Visual.
- Highlight anchor text (e.g., Buy on Amazon).
- Click the chain icon, paste your affiliate URL, and hit Apply.
- Switch to Visual.
- Open in New Tab & NoFollow
- Click the link, then the gear icon.
- Toggle Open link in a new tab.
- Add rel=”nofollow sponsored” in the Link Rel field (to comply with Google and FTC).
- Click the link, then the gear icon.
2.2 Gutenberg (Block) Editor
Paragraph Block
- Add a Paragraph block.
- Type your text: “Check this out on Amazon.”
- Highlight text, click the link icon, paste your affiliate URL.
- Enable Open in new tab.
- Under Advanced, add nofollow sponsored in Additional CSS class(es) or use a plugin to handle rel attributes.
Button Block
- Insert a Buttons block.
- Click Add text…, type “Shop Now on Amazon.”
- Click the pencil icon, paste your URL, toggle Open in new tab.
Image Block
- Upload or select an Image.
- In the block settings, under Link Settings, choose Custom URL and paste your affiliate link.
- Toggle Open in new tab.
Custom HTML Block
- Insert a Custom HTML block.
- Paste Amazon’s HTML snippet from SiteStripe or Dashboard.
- Click Preview to ensure it displays correctly.
Step 3: Leveraging Affiliate Link Plugins
Using a plugin streamlines link management, cloaking, and tracking.
| Plugin | Key Benefit |
| Amazon Associates Link Builder | Official plugin; search Amazon products in-editor |
| ThirstyAffiliates | Link cloaking; auto nofollow; categorization |
| Pretty Links | Shorten URLs; track clicks; auto replace keyword |
3.1 Amazon Associates Link Builder
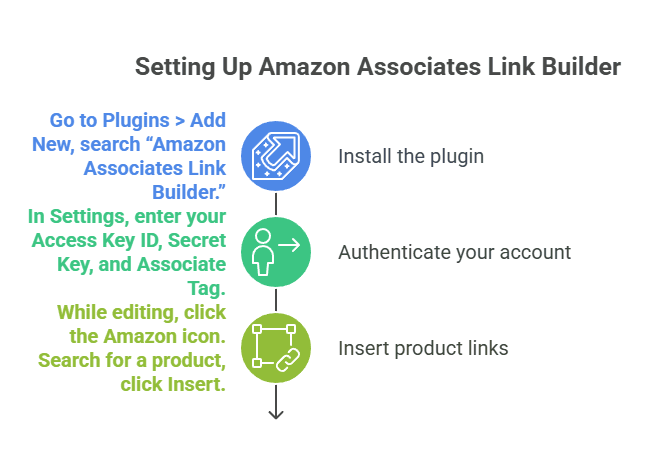
- Install & Activate
- Go to Plugins > Add New, search “Amazon Associates Link Builder.”
- Go to Plugins > Add New, search “Amazon Associates Link Builder.”
- Authenticate
- In Settings, enter your Access Key ID, Secret Key, and Associate Tag.
- In Settings, enter your Access Key ID, Secret Key, and Associate Tag.
- Insert Links
- While editing, click the Amazon icon.
- Search for a product, click Insert.
- While editing, click the Amazon icon.
3.2 ThirstyAffiliates / Pretty Links
- Install & Activate.
- Create a New Thirsty Link or Pretty Link.
- Enter your affiliate URL.
- Assign a slug: /best-headphones.
- Enter your affiliate URL.
- Use your cloaked URL (https://yourdomain.com/best-headphones) in posts.
- All links are automatically set to nofollow and open in a new tab.
Step 4: Best Practices for Affiliate Links
4.1 FTC Disclosure & Amazon TM Compliance
- Affiliate Disclosure: Place a clear statement at the top of each post:
“As an Amazon Associate, I earn from qualifying purchases.” - Trademark Usage: Include ® after “Amazon” on first mention.
4.2 NoFollow & Open in New Tab
Google treats sponsored links differently. Always:
- Add rel=”nofollow sponsored”.
- Set links to open in a new tab.
4.3 Contextual Placement
- Embed links where readers expect them (within reviews, comparisons).
- Avoid placing too many links back-to-back.
4.4 Visual Cues
- Use buttons or banners to draw attention.
- Style links consistently with your theme.
Step 5: Advanced Techniques
5.1 Using Shortcodes
Define a shortcode for links in your theme’s functions.php:
function amazon_link_shortcode($atts, $content = null) {
$a = shortcode_atts([‘url’=>”], $atts);
return ‘<a href=”‘.esc_url($a[‘url’]).'” target=”_blank” rel=”nofollow sponsored”>’.$content.'</a>’;
}
add_shortcode(‘amazon’, ‘amazon_link_shortcode’);
Usage in editor:
[amazon url=”https://www.amazon.com/dp/B08N5WRWNW?tag=yourassociate-20″]Buy Noise-Cancelling Headphones[/amazon]
5.2 Banners & Widgets
- In Associates Central, go to Native Ads > Banners.
- Copy widget code and paste into a Custom HTML widget in Appearance > Widgets.
5.3 Automated Price & Stock Updates
- Use the Amazon API or plugins (e.g., AZAPI) to dynamically fetch price, availability, and update them every 24 hours.
Scaling Your Workflow with Affpilot AI Auto-Blogging
If you plan to publish dozens—or even hundreds—of Amazon affiliate posts, manual methods become time-consuming. Affpilot AI offers an auto-blogging solution designed to generate and publish affiliate‐optimized content in bulk.
What Is Affpilot AI?

Affpilot AI is a powerful content automation platform built for affiliate marketers, bloggers, and SEO pros. Its Amazon Review Article Writer feature transforms your keywords or ASINs into ready-to-publish review articles—complete with embedded Amazon affiliate links.
Key Benefits
- Effortless Content Creation
Generate professional reviews with minimal input. You save hours that go toward promoting your site instead of writing drafts. - Real-Time Product Data
Pull updated product details—features, specs, and images—from Amazon automatically. - SEO-Optimized Reviews
Articles are crafted to rank higher in search results, driving qualified traffic. - Direct Publishing
Publish reviews directly to WordPress (or Blogger) with one click—no extra copy-paste.
Bulk Generation: Up to 1,000 Articles at Once
Imagine typing 10 keywords and walking away. In minutes, Affpilot AI can generate—and even schedule—up to 1,000 unique Amazon affiliate articles, each with your Associate Tag embedded. What could you achieve with all that content?
How to Use Affpilot AI for Amazon Affiliate Posts
- Log In to your Affpilot AI dashboard.
- Navigate to Amazon Review Article.
- Enter Keywords/ASINs (one per line).
- Set Quantity: Choose how many articles to create.
- Configure API & Affiliate Details:
- Add your Amazon API credentials (or toggle on “Write without API” and input your Store ID).
- Confirm your Associate Tag is set.
- Add your Amazon API credentials (or toggle on “Write without API” and input your Store ID).
- Customize Tone & Structure: Choose your AI model (GPT-4, GPT-4.o mini).
- Click Write Amazon Review Article.
- Review & Publish:
- Edit any sections if desired.
- Hit Publish to WordPress.
- Edit any sections if desired.
Thought-Provoking Question
What would it mean for your business to publish 100 Amazon affiliate posts in the time it takes to grab coffee?
Next Steps for Your Affiliate Strategy
- Start Small: Manually add a few links to test placement and conversion.
- Measure & Optimize: Use Google Analytics and plugin stats to track clicks and earnings.
- Scale Smart: When you’re ready to expand, lean on Affpilot AI to automate content creation without sacrificing quality.
Which path will you take today—manual precision or full-throttle automation? The choice shapes your earning potential.


